


I found 2 really cute linen skirts in the thrift store one day over the summer and decided they would make a cute sheath dress. I needed more fabric though and I was able to find the same paisley skirt on ebay for a reasonable price!

You can follow this method for any style of dress, you just need to make sure you have enough fabric to work with. I decided to make a loose sheath type dress because it's one of my favorite styles that I can wear to work!
Supplies
Sewing pattern (I made mine!)
Large paper for tracing a copy of your pattern
Tracing wheel (helpful but not necessary)
Skirts (or other garments for harvesting)
Single fold bias tape
Seam ripper
Patience!
When picking out garments to recycle for this style of dress (or any garment) you want to make sure you're picking out fabrics with the same or similar fiber contents and similar drape.
For example, here's what I'm using...
The green skirt is 100% linen with a synthetic lining. The paisley skirts are a linen and rayon blend. The paisley skirts are a little lighter weight then the green skirt, I think because the green skirt is just a higher quality.


Once you choose your garments, you want to deconstruct them! These are close fitting pencil skirts, so I seam ripped to get the biggest pieces of fabric to work with as possible. It's actually one of my favorite parts of upcycling!

If it's your first time doing this sort of project, you'll want to pick a pattern that has some ease (extra space, loose fitting) so that you have some room to play. You could also try a princess seam pattern that already has the main bodice in separate pieces. I created my pattern by copying a dress in my closet and sewing a sheep dress! That's the pattern I will be modifying for this project.


Before you do anything with your pattern, you'll want to brainstorm the best way to arrange your fabric into a garment. I do this by putting a dress on the floor and laying my fabric over it, so I get an idea of the final look. Check out all my options! This will inform you where you need to cut your pattern into pieces to get the brainstormed look. Its also helpful to plan this way because upcycling usually means you're working with smaller sections of fabric!
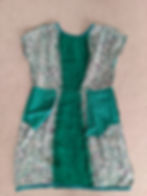
I wanted my dress to look more like a color-blocked work dress, so I opted for breaking my sewing pattern along princess seam lines. You can always break your pattern pieces into smaller blocks, it just requires more planning and sewing!
Pattern Adjustments
Take your existing sewing pattern and trace a copy on to large paper. My pattern that I drafted only has 1 piece (it's really simple) but I also decided to incorporate a yoke (visible) pocket from a simplicity (1887) shorts pattern that I really like.

On your copied pattern, start drawing where your design lines will go. I added a waistline and split the bodice and skirt into 4 pieces. Cut your pattern along your design lines.

I taped extra paper along the edges where I split the pattern to replicate seam allowances. You can skip this part if you like but it helped me keep straight how much fabric I needed!


Start laying out your pattern pieces on your fabric to confirm that you have enough fabric. Try to keep your pieces straight along the fabric grain, meaning the weave, this will ensure that your material doesn't get so wavy.
Cut your fabric!

Start piecing the bodice together! Take the center front bodice (right side up) line up a side bodice piece along the edge (right side down). Sew and repeat for the other side and the back bodice. I forgot to take pictures for the next few steps but I've drawn lines where I sewed for reference!

Take your 2 bodices, right sides facing and sew along the shoulder seams.

Again, with bodice pieces facing each other, sew from the underarm down to the waist.

Try on your top at this point to check the fit- if you need a little more wiggle room you can unpick your seams and re-sew them with less seam allowance!

Construct the skirt in almost the exact same way as the bodice, line up side pieces along the center edges and sew, but don't sew the sides yet if you're adding yoke pockets like me!

My yoke pocket required a bit of extra finagling. I didn't have enough linen fabric for the entire pocket, but I did have just enough for it to show on the yoke (visible) part of the pocket! To do this, I cut the pocket pattern from the skirt lining

I then cut a pie shape, slightly larger than the yoke from linen. I folded the curved side under slightly and top stitched it (right side up) to the pocket lining (right side up) with right angle corners lined up. I sewed a zigzag stitch all around the pattern piece to prevent fraying. Picture accidentally shows two yoke facings!

Lay your front skirt piece right side up (it will have scoops out of the hips) and line up the pocket curve (right side down) and sew. Clip curve with pinking shears.

Flip so the curved seam is right side out and pocket fabric is underneath the dress fabric, iron (don't skip this time!).

Flip your skirt so that you're now looking at the wrong side of the fabric, the pocket is layered on top (right side facing you). Take your pocket and fold it in half so that the straight edge lines up with the edge of your skirt. It should fill in that pie shaped piece. Iron this crease.

Sew the bottom of the pocket shut with right sides facing.

Baste (sew loosely) the pocket in place along the top edge and side seam.
Repeat above steps for your second pocket!
This is what the dress looks like inside out once it's finished- should give you a pretty good idea of how those yoke pockets go in!

Sew the front and back skirt together, right sides facing.

Pin the bodice and skirt together by having the skirt right side out and lining up the waist seam with the bodice (inside out) making sure to line up the major side seams.
If your bodice or skirt is bigger than the other, you can try gathering a portion prior to sewing or you can take in some your seams. I had to do the latter, I tried gathering at the center front but because my green fabric is a little stiffer it made it look a bit frumpy. Ended up seam ripping the gathered waist and taking in my center panels a bit by re-doing the first step

Try your dress on to check the fit!

Next we need to tackle finishing the hems! Starting with the sleeves as they're the easiest! If your sleeve pattern is a part of the overall dress like mine is, you might need to clip into the arm pit and trim the seam allowance so that your sleeve can move freely. I also added a little bit of seam tape from the arm pit to the edge of the sleeve for extra strength.
Fold the sleeve hem up twice, so the raw seam is hidden and stitch into place.
The neck binding is next! Take your single fold bias tape- it should be a flat strip of fabric with 2 little folded edges on the sides, with no fold in the middle. If it has a fold in the middle its called double fold bias!

Anyway, line up the end of your bias tape (and unfolding one of those so it lines up with the raw edge of dress) to a shoulder seam with the folded edges facing you and the pretty sides facing each other. Pin or using sewing clips to keep in place.
I like to leave a tail at the start and end of my binding, while I pin it so that I can determine exactly where I need to sew the binding into a loop so that it lines up with the shoulder seam. Pinch your binding ends together, unfolded, and sew close to where it would line up with the shoulder seam. DO NOT TRIM your binding yet, leave the tails long just in case your binding needs extra wiggle room.
Start sewing your binding around the neckline, you have to sew along that tiny folded flap.

Check your work to make sure you sewed through both the bias tape and your dress. I found that one area the dress fabric came loose from the bias tape because it was close to the edge and loosely woven. I added an extra patch of linen fabric to strengthen the area.

Trim your tape ends and flip your bias tape to the inside to iron your neckline flat (with that other bias fold still folded). Seriously, don't skip the iron like I did, do as I say not as I do!

Sew along the folded edge of your bias tape, I prefer to do this from the inside so I can see that I'm actually catching everything but you could also sew from the outside if your machine has a nicer top stitch!

Time to hem the skirt! You can hem the same way we did the sleeves or the like the neckline, it depends on what length you want the final dress to be. I opted for the single fold bias finish as I didn't want my dress to be too short. Repeat the exact same steps you did for the neckline.
Give everything a final run under the iron and admire your work!


If you try this project, I'd love to see! Tag @Sunny_Salvage on Instagram or Facebook and follow me on Pinterest for more upcycling ideas!
Happy Upcycling!