
How to Fix a Sleep Mask
- Allison Baker
- Sep 2, 2022
- 3 min read

I recently took a trip that involved a red eye flight AND midnight sun (hello Artic Circle!!) so I really needed to have a sleep mask to block out all that extra light and catch some z's.
I had an old sleep mask that I got for free at some point, from some other red eye flight of trips of yore. JK it was probably 10 years or less, but the elastic on it was so degraded and nasty.
If you have the same problem, you can totally just snip the old elastic off, measure for new elastic, and sew it on. BOOM, done, easy mend.
But I can't do that! Look at this drab grey polyester fabric. Gross. I need to revamp the whole thing!

I can already hear it now- sleep masks are so easy to make, why not just start from scratch?!
Because I said so, ok! It also means there's a little bit less trash in a landfill by reusing part of it, so I guess that could be my real excuse...
I take it if you're here though, you're in the same boat of wanting to fix yours. So I guess I don't really need a reason :D
Supplies
An old eye mask
Cotton fabric
Skinny elastic (I used picot lingerie elastic)
Bias tape
Seam Ripper
General Sewing supplies
Evaluate your eye mask construction.
Is the elastic edge raw or hidden in a sandwich of fabric? or bias tape?
Is there a nose gusset?
Some other funky construction?
My mask has this nose gusset, which is super helpful when flying if fellow passengers decide to binge watch the whole flight! It's going to be the trickiest part to replicate for this project though.

I started by clipping off the elastic and disposing it. I then seam ripped the bias tape that was holding in the nose gusset, paying close attention to how it was attached so I can attach it the same way later.

Take your nose gusset and trace the shape on a folded piece of fabric. Trim the fabric, leaving a small seam allowance. Sandwich the OG nose gusset in between your new nose gusset fabric, pretty side out

Back to the eye part of the mask! Trim off the bias tape near the nose. Trace your eye shape on to 2 layers of your cotton fabric. Cut out, you don't really need a seam allowance but I left it just in case.
Sandwich the old eye mask between your new mask pieces, with pretty sides out on both sides.


Pin the nose gusset to the bottom curve of the eye mask, lining up raw edges. This is tricky to get because it's creating a sculptural curve, so take your time!

Sew down your nose gusset, close to the fabric edges but making sure to catch the thick original mask layer. If I were redoing this project, I wouldn't have sewn through the front eye mask piece, I would have left it off to ensure that this sewing line stayed invisible!

This is what the front looks like on mine, that seam ends up not being hidden under the bias tape like I thought! To avoid, sew closer to the edge OR don't have the front eye mask layer, add it at the next steps.
Measure a comfy elastic length by holding the mask up to your face and wrapping the elastic around to both ends. Mine is a little over 13" long, which ended up being a bit snugger than I liked. Try not to stretch the elastic while to measure to avoid this issue. You can do 1 elastic or 2!
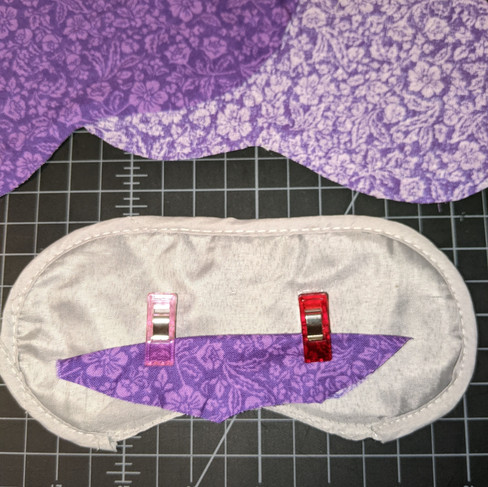
Clip/pin your elastics to the edge.

Take your bias tape and pin it all around the edges of the mask, hiding the raw edges of fabric at the gusset and from the elastic. I know this isn't the *correct* way use bias tape, but I was impatient!

I sewed the bias tape down with a zig zag stitch from the narrower side of bias tape, this stitch isn't necessary but it was more forgiving when I missed the back edge a little.

And that's it! See, it really wasn't ALL that much harder than making one from scratch!

This worked really well for my trip, though the nose gusset felt a little unnecessary. I chose to wear a facemask too on the plane so I looked like a mummy!
If you try this project, I'd love to see! Tag @Sunny_Salvage on Instagram or Facebook and follow me on Pinterest for more upcycling ideas! Hope you feel inspired to mend something instead of making or buying brand new!

Коментарі